Monday, November 18, 2013

Custom headset caps

Ever since threadless headsets became standard on most new bikes (maybe 15 years ago), headset caps have become a popular way to customize bikes. A few years ago when I needed to replace a cap on my road bike (it broke due to overtightening), I considered some of the options from Purely Custom but eventually just got a plain one. I couldn't think of any text interesting enough to put on a cap, and none of the artwork options interested me much. Heather recently got a new road bike, and I was looking for something creative for her bike on her birthday when I discovered Kustomcaps, which will make a cap with completely custom artwork in addition to various text options. In trying to come up with designs that fit the circular area, I realized that Celtic knots are well suited to this, and Heather happens to be a fan of these type of designs, as she has several pieces of jewelry featuring them. So, I came up with a couple of designs:


These designs were created using Inkscape. The procedure for creating the weave pattern is very helpfully described in this tutorial. Eventually, I settled on the second design, which allowed a little more space to add some text. Here's the result (with a blue bolt to go with it).


I liked it so much I decided I needed one for my own bike. As it happened, we recently made a trip to Ireland, and inspired by the Celtic knot on Heather's bike and my own Irish heritage, I was on the lookout for interesting and unusual designs. I found what I was looking for in the floor tiles of St. Patrick's Cathedral in Dublin.


This was one of many very interesting patterns from that particular floor that we took pictures of. I had to stretch the proportions and add or remove parts in order to get the square pattern to fit a circle better, and I came up with two different candidate designs for a headset cap.


These designs were also created in Inkscape, in this case by importing the photo and using the "trace bitmap" feature to get an outline of the pattern, which then required considerable tweaking. I ultimately chose the second of the two designs. Here it is installed on my bike.


Now I don't think I can go back to a plain cap on my bike.

Tuesday, October 22, 2013

Short Cranks for Kids on Tandems

In my first post about my Bike Friday tandem from last year, I showed a picture of the Ride2 crank shorteners I first used for making the rear crankarms a more suitable length for riding with small kids on the back. Crank shorteners get the job done, but they are a bit expensive ($110 on Amazon right now), and they have the effect of spacing the pedals out further away from the bottom bracket (the so-called Q factor). I would assume this is more noticeable to riders with short legs, so I think it's a less than ideal solution. Since the Bike Friday was already set up with single side drive due to the DualDrive shifting, the rear cranks can be replaced with any standard crankset.

When we acquired another tandem last year, I put the crank shorteners on that bike and tried using a short crank on this one. The cranks pictured here are made by Sinz, who make parts for high-end BMX bikes. These cranks are available for both square taper and ISIS bottom brackets, in lengths from about 130 mm to 180 mm in 5 mm increments. They can be found online for about $60, and occasionally less. The ones in the picture are 145 mm ISIS cranks. (Note that the bike comes with square taper bottom brackets, but I found an unusually good price on an ISIS crank and happened to have an extra ISIS bottom bracket.) The cranks have a 110 mm bolt circle diameter, which matched the old cranks, so I just moved the original chainrings over to the new cranks.


I think this is a superior solution for tandem riding with kids. It's not adjustable in length like the crank shortener, which has three different lengths. However, it is possible to buy two Sinz cranksets in different lengths for not too much more than the cost of one pair of crank shorteners. If I did it again, I would do that, getting them in lengths of 145 and 155. Using this approach requires single side drive, but in this era of compact road cranksets and 11-speed gearing, one could theoretically convert even a standard double side drive tandem to use cranks like this without losing much in terms of gearing range.

Bike Friday Tandem Customizations

I already wrote previously about my Bike Friday Family Tandem. I used it for over 2 years in the configuration it came in: flat handlebars with Sachs (now SRAM) 3x7 Dual Drive shifting. I prefer drop handlebars, so last winter I decided to switch out the handlebars.


Switching to drop handlebars on this bike requires a few other changes. First of all, I needed a pair of 3x7 Shimano STI brake/shift levers, which various online sources claim are compatible with the older DualDrive hub/derailleur combinations. Shimano hasn't made a 7-speed shifter for a number of years, so these have to be bought on the secondhand market, but even then they are hard to find because Shimano had already gone to 8 speed on their high end drivetrains when they introduced STI in the 1990s. The one exception is the RSX shifter, which presumably was sold on some lower end road bikes in that era, and comes in a 3x7 configuration. I found these RSX shifters on eBay.


One problem these shifters had when I bought them was that the smaller levers (the ones that shift to a smaller chainring or rear cog) did not engage. This apparently is a fairly common problem with these shifters and it is caused by the old grease getting sticky. I can confirm the claims made by others on the internet that this problem can be fixed relatively easily by spraying degreaser into the shift mechanism a few times, followed by a light lubricant, which eventually frees up the mechanism.


The brakes on this bike (drum brake front, V-brake rear) expect a longer cable pull than STI shifters are capable of generating, so it is necessary to add the Problem Solvers Travel Agent. I've used them on another tandem already and they work great. They come in two varieties, one for V-brakes and one for disc brakes (or drum brakes), so I installed one of each type. Here's the rear V-brake with Travel Agent installed. It replaces the curved "noodle" normally installed between the cable housing and brake.


The disc brake version comes with a hole at the top so that it can be attached to the fork using a cantilever brake mount. This fork doesn't have cantilever mounts, so I attached it to the fork with zip ties and used a piece of inner tube around the fork blade to prevent scratching the paint and hold it in place. So far, braking performance both front and rear with the travel agents installed has been great.


The left shifter, which normally goes to the front derailleur, has worked fine operating the 3-speed internal hub. It takes some getting used to because when connected to this hub, its operation is backwards from a front derailleur: the large lever shifts to a lower gear rather than a higher gear. The combination of the right shifter and rear derailleur has been less than ideal so far. The cable pull for each click isn't quite enough for the derailleur. It's adjusted so that it works OK in the middle of the gearing range, but starts to miss shifts as I get out to the edges. It's possible the derailleur or shifter are just old, but the original grip shifter that came on the flat handlebars worked better.

DIY Winter Cycling Gear

Some time in the late 1980s, I bought this neoprene headband from the Performance Bike Shop in Boulder, Colorado. Since then, it's been used for countless miles of winter cycling, including two years of 12 mile commutes during college, and many other winter outdoor activities. It's been great for cycling in particular because it's quite thin and easily fits under a helmet while keeping my head and ears warm for any temperature above freezing. Colder than that usually requires additional headwear.


Its design is incredibly simple: a single peice of neoprene with a single seam at the back stitched together using a zigzag stitch.


As is evident from the first picture, it's starting to show its age a bit. Some of the foam material has started to break down so it doesn't feel quite as thick as it used to. I'd have bought a replacement years ago if I could find one, but have never seen anyone selling anything like it. Last year Heather and I started doing more winter rides and it became apparent that her fleece headbands were often not enough. It occurred to me that my headband should be quite easy to replicate. Neoprene fabric can be bought in small quantities online from various sources. I bought a 1 foot by 4 foot piece of it from an eBay seller for about $15. I estimated the thickness of the fabric used in the original to be about 2 mm thick, so I ordered the material in that thickness, but it appears to be a slightly thicker than the original. It's possible the original was actually 1.5 mm (I think the fabric is also available in that thickness), or that it's just thinner due to deterioration over time. In any case, 2 mm seems like about the right thickness for me, but others may prefer something in a different thickness.

I have a relatively large head, and Heather's is relatively small, so based on the original headband, I created two separate patterns, to fit large and small head sizes. In case this is useful to anyone, I created this PDF document with patterns for both sizes.


Note that the patterns reach relatively close to the edges of letter-sized paper, so check the print settings when printing it out. Some viewers by default will try to shrink it to add extra margin at the edges. In Chrome PDF viewer, uncheck the "fit to page" option. To make sure the printout is the right size, I've added measurements to the diagram so the size of the printed pattern can be checked before using it to cut fabric.


Here's the end result. It basically looks like the original, except that it's clear my pattern cutting skills weren't quite good enough to get the bottom of the seam to line up perfectly. Since I made them in two sizes, I stitched my initial into it in order to tell them apart coming out of the laundry. I made a total of 3 of these using about 1/3 of the neoprene fabric I bought, so for about $15 in materials (probably about what I paid for the original headband), someone could make 9 of these.

Sunday, January 13, 2013

Raleigh Tandem With Customizations

I wrote a couple of months ago about acquiring a second tandem. As I noted then, the Raleigh tandems look like a great option for riding with children because they are reasonably priced and can accommodate relatively short riders with just a few modifications.

Fit Customizations

The most important modifications are to get it to fit its riders. The goal was to be able to comfortably fit an 8-year-old on the back and a 5'4" rider on the front. It should be possible based on my measurements of the frame, but the suspension seatpost that came installed in the rear made it impossible to get the seat down as low as I needed. Furthermore, the oversized seat that came on the bike added some extra height of its own.


In the front, the seat went low enough, but the reach to the handlebars was a bit far for a shorter rider, so I wanted to reduce that by moving the front seat as far forward as possible and installing a shorter reach stem. The set back of the stock seatpost on the front limited how far forward the seat could move, so I moved that seatpost to the rear and installed a smaller saddle I happened to already have. The challenge, then, was to find a seatpost for the front with the right diameter and no set back that didn't cost a lot. The diameter turned out to be 29.2 mm, which appears to be common on tandems, but in general is a somewhat non-standard size.


This seatpost made by Origin8 comes in a huge variety of sizes, including the 29.2 mm that I needed. While it didn't matter in this case, it's also very long at 400 mm, so it would be easy to set up this tandem for a very tall rider using the same seatpost. The relatively relaxed seat tube angle of the frame means that putting the seat all the way forward like this will result in a position that will not feel unusual to a rider accustomed to typical road bikes.

The remaining fit-related customizations included the installation of this short reach stem. It's a Profile Design Boa with a 65mm extension and relatively steep angle (45 degrees if I recall correctly), which brought the handlebars in about 8 cm closer than the original stem did.


I also added Ride2 Crank Shorteners to the rear cranks. The pedals are currently installed in the outermost hole, which results in an equivalent crank length of 145 mm. These shorteners were transferred over from my other tandem.


With these customizations complete, the bike was basically ready to ride, but I wasn't done changing things yet.

Optional Customizations

The other customizations made to this bike were purely based on our preferences. I replaced the 26x1.95" tires with more touring-oriented 26x1.25" tires, which are better suited for the type of riding we do. I replaced the stock pedals in the front with different ones that would take toe clips. Heather and I are both used to road bikes with drop handlebars, so I also replicated that setup on this tandem. The existing drivetrain is a 24-speed Shimano setup, so I got a used pair of Shimano Sora 3x8 speed brake/shift levers, Tektro auxiliary brake levers, and a used road handlebar.


Because road and mountain bikes use different shaped cable ends inside the levers, I had to buy new cables as well. The extra cable lengths required for a tandem required that I do a lot of careful measuring before I bought anything so I could be sure everything was long enough. In the end, I concluded the least expensive option was a complete road cable kit plus an extra cable for the rear derailleur. I bought the Jagwire Racer XL kit, which had brake cables that turned out to be long enough for both front and rear brakes on this frame. The derailleur cables were not long enough, but the rear cable was long enough for the front derailleur on the tandem, and for the rear I bought a Jagwire stainless steel cable in a length of 3100 mm.

The linear-pull cantilever brakes (also known as V-brakes) that came on the bike require a longer cable pull than typical road brakes. In order to match the shorter pull of road brake levers with the longer pull required by the cantilevers, Problem Solvers makes this little pulley called the "Travel Agent". The cable wraps around the smaller disc and then jumps to the bigger disk, effectively doubling the distance traveled by the cable as it comes out. The second hole at the top is so that the effect can be reversed if someone wanted to use mountain-style brake levers with road-style caliper brakes. It works great. The Jagwire cables (except for the extra rear derailleur cable I bought) come with a black PTFE coating that makes them super slippery, and all of the braking and shifting on this bike is really solid.


The choice of red accents actually started with the water bottle cages. I was searching online for some inexpensive bottle cages to go on this bike and found something that came in black, gray, and red. We liked the idea of red and bought those, and subsequently got the cables and handlebar wrap in red. I think it looks great with the otherwise monochromatic black, white, and gray color scheme.

Completed Project

Here's the tandem with all of the customizations complete.


The tandem was bought for $200. The most expensive part of the fit customizations are the crank shorteners, which run around $90. Adding a seatpost, stem, and smaller saddle brought the size customizations to a total of around $150. The other customizations probably added more than $200 more, with the shifters being the most significant cost, even buying them secondhand, but the total cost of this tandem is still well below what I spent on my Bike Friday tandem, so I consider it money well spent.

Part Sources

We don't have many bike shops in Champaign, Illinois, and even a bigger city is unlikely to have a bike shop that stocks a lot of the items I've described here, so I do a lot of shopping online for parts. Given Shimano's constant gear inflation, finding shifters for older drivetrains is something that mostly has to be done on the second hand market, and eBay is an important source for that. For the other items, the one source that seems to consistently have almost everything I'm looking for, no matter how obscure, is Niagara Cycle Works, who I buy from through Amazon marketplace. They don't offer super fast shipping, but everything has always arrived by the date promised, the shipping charges are reasonable, and they usually have the lowest available price of the Amazon marketplace sellers, or are close enough to it not to bother buying from someone else.

Saturday, November 3, 2012

A new tandem

As noted in my prior posting about tandem trailers, I've decided they aren't safe and have given up on the one we have. With my children currently at the ages of 8 and 6, we're still a few years away from the age where they can keep up on longer rides, and where I feel comfortable with them riding their own bikes on certain roads (such as the narrow bridges near our neighborhood). As I've already written, I'm a big fan of the Bike Friday tandem, but it's hard to find even a used one for less than $1000 on eBay, so I decided I would spend the winter looking for alternatives that might cost a little less. I've decided I'm less concerned about the portability offered by Bike Friday tandems, so I'm mainly concerned that the rear seat go low enough for a (relatively tall) 8-year-old.

A few weeks ago, I found a local Craigslist seller selling this Raleigh tandem for $200:


Amusingly, the seller listed the bike as a Schwinn, complete with a similar picture to this with the Raleigh logo plainly visible. Based on some internet research, I was able to determine that this model is from 2002, and is called the "SC Tandem". The frame is a blend of chromoly and high-tensile steel. It appears from Raleigh's web site that they have sold a similar tandem for the last 10 years or so, with varying model names, but more or less the same frame geometry. For a while there was an aluminum frame version that retailed for around $900, but the steel frame version has usually sold for about $650. The official specifications for the frame size are 19.5 and 16.5 inches. Based on my seat height measurements of the other tandem, I concluded that 16.5 inches might be low enough for my needs, so I took a risk and bought the bike.


This closeup of the rear triangle shows the somewhat odd design choice of what amounts to two sets of seat stays. The rear brake is mounted on the lower ones, making the top one more or less unnecessary (though it does have mounts for a luggage rack). The quick release seatpost collar is removable, so in theory it would be possible to cut off 1-2 cm of the top of the rear seat tube to get the seat lower, but it appears that will not be necessary for my 8 year old. If I were trying to get this tandem to fit a smaller child, it seems feasible to simply cut off the upper seat stays and more of the seat tube. This being a steel frame, some paint or rust protection for the affected areas would be necessary, but the result would be a frame with a geometry not much unlike some of the other common tandem frame designs out there.

There are a number of things I plan to modify on this bike. In particular, the rear seat has a suspension seat post, which does not appear to be functional, and will not allow me to get the seat all the way down to the frame where I need it. So, I will be replacing that and making other changes to bring the front seat and handlebars closer together to accommodate a 5'4" rider. I'll write more when I get that far.


Also, at some point I'll consult the owner's manual to learn why night riding is dangerous.

Thursday, October 18, 2012

Bike Friday Family Tandem

After buying a tandem trailer, we used that in conjunction with the child trailer for one summer, with each parent pulling one of the trailers. At the time our children were 5 and 2. As our son turned 3, he started to be jealous watching his sister pedal, so we occasionally let them switch places. He couldn't really turn the pedals on the trailer bike all the way around, but he seemed to enjoy it anyway. However, it became clear that soon enough neither of our kids would fit in the trailer very well and that we needed a long term solution. We could have probably got another tandem trailer eventually, but at some point I started doing research on tandems. Sheldon Brown wrote a great article about tandems and kids. There were two primary features I was looking for in a tandem:
  • The rear seat had to go low enough for a 5 year old.
  • It had to be easily transportable.
In retrospect, the transportable aspect has been less of an issue than I expected because most of the family bike rides we do are from home anyway. My research has turned up a number of very interesting options:
  • Bike Friday. A maker of folding and travel bikes that has several tandem models.
  • Brown Cycles. I particularly like the "child in front" bikes they make, a feature I'm sure my kids would want if they knew it existed.
  • Co-Motion's PeriScope line. In particular, the PeriScope Trident Convertible is something I wish I had sometimes, but it's a serious investment. 
  • Circe Helios. It looks like a great bike, but they are in the UK, so getting one in the US would probably require expensive shipping.
  • Build your own. If I had the welding equipment and expertise, I would totally build one of these.

Of all these options, Bike Friday's tandems end up being one of the least expensive, starting at $1500. That's still a lot, so I started looking at used ones. Having watched several Bike Friday tandems auctioned on eBay, I have concluded that any opportunity to buy one of these for under $1000 is a good deal. I ended up paying somewhere between $1200 and $1300 for a bike that originally retailed for around $1800, but shipping costs brought it close to $1500.


This is what the bike looked like I first got it in 2010. The long stem on the rear handlebar was originally on the front, but I needed it in the back to get the handlebars closer to the rear seat. The rear seat is in its lowest possible position in this picture, which is low enough to fit an average 4-year-old, with one exception: the crank length. This bike has standard 170 mm cranks, while the typical lengths on children's bikes are 135 mm for 16 inch bikes and 145 mm for 20 inch bikes. We tried one short ride and it became clear that the adult length cranks were not going to work. There are two solutions out there. One is the "KidBack", which is essentially an additional bottom bracket and cranks that attach on the seat tube. It's designed more for full size tandems, though so the second (and less expensive but still pricey at $90) option was what I did: the Ride2 crank shortener. This device attaches to the crankarms through the pedal threads, and provides 4 alternate mounting locations. From my fairly inexact measurements, they subtract 25, 35, 45, and 55 mm of crank length, giving lengths from 115 to 145 mm on this 175 mm crank. The downside of crank shorteners like this is they increase the space between the pedals (sometimes referred to as Q-factorby an inch or so, which might make it harder for small legs to pedal.


My bike came with SRAM's DualDrive system, which pairs an internally geared 3-speed hub with a 7-speed derailleur (newer models are 8 speed, but my bike is over 10 years old). For tandems, this makes it possible to put the drive chain and timing chain on the same side of the bike.


This gearing system actually makes it possible to use a less expensive solution for short cranks, which I hadn't considered at the time I bought the crank shorteners. BMX products maker Sinz makes a crankset for square taper bottom brackets that comes in a huge range of sizes from 125 to 180 mm. They retail for around $60, but I've sometimes seen them available for less. They have a 110 mm bolt circle diameter, which fits a large range of road chainrings these days, including the ones on this bike, and they allow for the installation of two chainrings. I've read that the spacing of the chainrings on Sinz cranks will put them too far apart to work properly with front derailleurs, but this is not a problem for the DualDrive system.

Had I bought the bike directly from Bike Friday, they would have customized the size to fit me exactly. By buying used, I had to figure out how to make it fit. One problem that became clear after a couple of rides that the handlebars were too low and too close. I found this stem which seems to fit me well, and is adjustable, making it fairly easy to modify the setup to suit another rider.


At one point I decided to get a pump and a traingle cargo pack for tools for this bike. As it turns out, neither fit without modifications. The Park frame pump, which is adjustable to a wide range of frame sizes, was a quarter inch tool long at its shortest setting for the pump peg on this frame (I hope newer versions of this bike have fixed that). I eventually was able to modify the pump to fit. Likewise, the triangle pack was a little too tall for the frame, so it took some modification on a sewing machine to take the lowest 1 inch off.


Below is the bike in its current setup. Note that my kids have got taller in the last 2 years, so the rear seat is higher. I have moved the rear water bottle cage to the handlebar. My kids found it was a long reach down to the top tube of the frame, especially with the horizontal orientation of the bottle. I've also added the luggage rack and bar ends. Even for a 10 mile ride (most of our rides with the kids are in the 10-20 mile range), I need to be able to change hand positions. I may eventually try to install a drop handlebar, which is what I would have got if I had ordered a new one of these custom.


As noted in my last entry about the tandem trailer, I think I should have bought one of these earlier and never bothered with the tandem trailer. This is a much more significant investment, so it's not for everyone, but if you want to do bike rides as a family, I think the Bike Friday tandems are an ideal solution for kids who aren't yet big enough to keep up on long rides. This is also a good option for larger families because you could theoretically pull a child trailer behind one of these (up to 3 children per parent!). I do have a friend who has pulled a child trailer behind a tandem trailer, but I've been soured on tandem trailers enough that I don't think I'd recommend that to anyone.

Sunday, October 14, 2012

WeeRide Co-Pilot Bike Trailer: don't waste your money!

We did family bike rides with both kids in the trailer until our oldest was about 5, at which point she was simply getting too tall to fit inside (she's taller than average). At that point, we knew it was time for her to graduate to something else, so we looked at our options in "tandem trailers", i.e. trailers where the child pedals. One of the most well known products for taking a child along on a ride is the Adams Trail-a-Bike. They seem to have a good reputation, but they are also one of the more expensive options (suggested retail is over $200, but it looks like Amazon has it for $160).

At the time, we decided it was important to be able to fit it into the trunk of our car. Most newer tandem trailers have some kind of folding feature which makes this possible, but I passed on a chance to by an older Trail-a-Bike because it lacked this feature. In the end, we chose the WeeRide Co-Pilot, which typically sells for less than half the price of the Trail-a-Bike.


Here is a closeup of the hinge in the middle that allows it to be folded over for transportation.


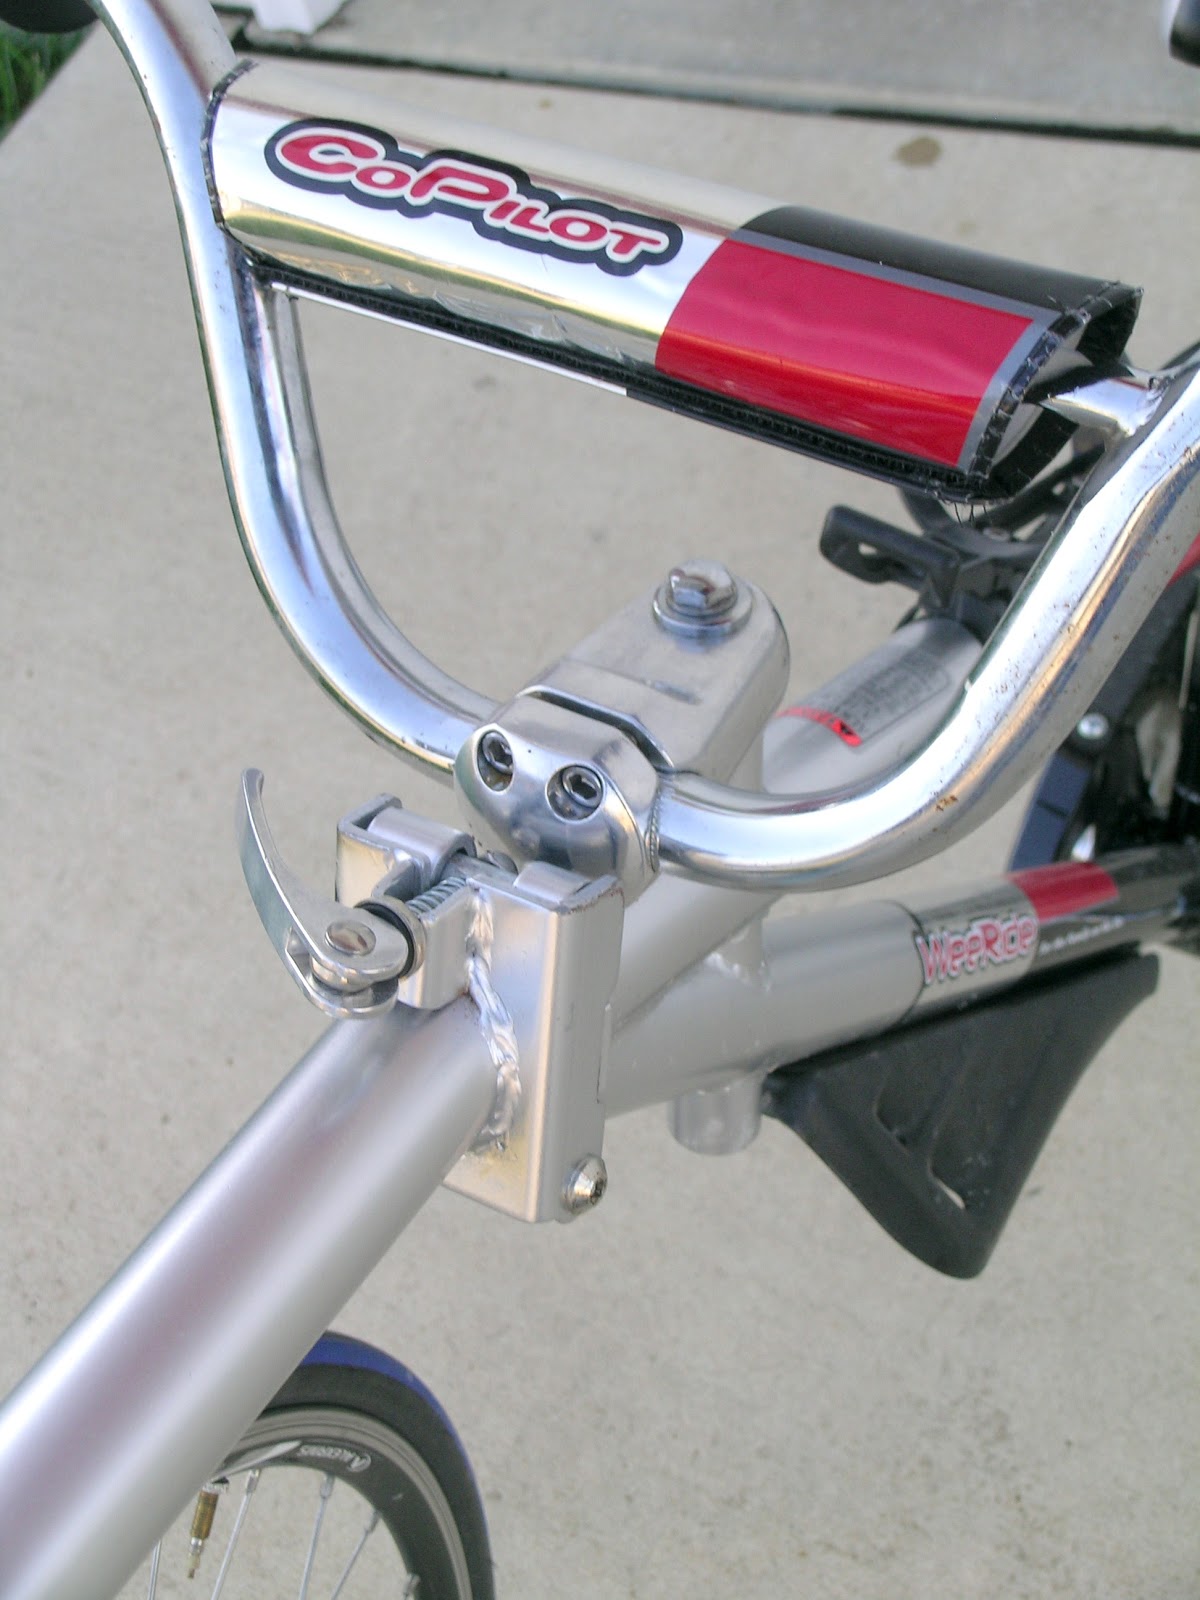
The rear 90% of the bike is solidly built and I have no complaints about it, especially for the price. The part that has turned out to be huge problem is the front part. Here is a closeup.


The hitch mechanism attaches to the seat post of the adult bike. It's not a particularly elegant design, but it works. Behind the hitch are two joints, designed to allow the trailer to move both horizontally and vertically with respect to the bike. The first problem with the joints is that the weld connecting them to the rest of the trailer is not straight. When the hitch is held perfectly level, the trailer bike leans a couple of degrees to one side.


This is not a one-time anomaly. While this trailer has generally received positive reviews on Amazon, there are a number of 1-star reviewers (full disclosure: I am one of them) who have described this same problem. I don't know how common this is, but there are clearly some quality control problems.

The second problem with the joints is that the bushings get looser over time. After 4 summers of regular 10-20 mile bike rides, there is now enough play in the joints that the trailer can flop back and forth several degrees. This is particularly challenging for the adult rider trying to keep the whole rig upright. A few weeks ago this finally resulted in a crash, and we have decided that it's time to retire the Co-Pilot and find a better solution for family cycling. WeeRide's web site says they now have a new hitch design, so it's possible they are aware of this problem.

The lesson learned from all of this was that if you want to buy a tandem trailer, you really need to spend the money on one of the more expensive models. A year after buying the Co-Pilot, I acquired a true tandem, and we have been using both for the last two years. After using both, I've concluded that the only real advantage of a tandem trailer is cost, and that anyone serious enough about riding to make the investment in a tandem is better off skipping the tandem trailer entirely and going straight from a trailer to the back of a tandem. The advantages of this are:

  • Better handling and balancing characteristics than a standard bike pulling a tandem trailer.
  • The child can actually help pedal no matter what gear you're in. Above a certain speed, a child on a one-speed tandem trailer can't pedal fast enough to actually contribute, so they end up just coasting and (in my experience) goofing off in ways that can make it a challenge to keep the bike upright.
  • A tandem can grow with the child past the age where they might be too big for the trailer.

Friday, October 12, 2012

Schwinn bike trailer

My last post was on a bike project, and now I've acquired yet another bike, this time a tandem for the purpose of cycling with my kids. There are other blogs out there where people have documented their experiences cycling with their children, and I've found them quite helpful. So, before I put up pictures of the new bike, I've decided to start from the beginning documenting my experience cycling with kids, the equipment we've used, what has worked and what hasn't, in case it's of interest to anyone out there.

The first piece of gear we got was your basic 2-child trailer. This would have been in 2005 when our oldest daughter was 1. This is a Schwinn, bought at a local big box store for around $160, if I recall correctly. This picture shows it with its "stroller" handle attached. We never used it that way, but I'm sure would do the job well.


There were (and still are) other options made by manufacturers who specialize in bike trailers (like Burley), but they cost considerably more. There are also cheaper options. After pulling this for hundreds of miles, many of those miles with friends pulling a smaller and cheaper trailer, I'm glad I spent the money on this one, and don't feel like I needed a more expensive one. The large wheels (16 inch) roll more easily than the 12 inch (or smaller) wheels common on many other trailers, and they use standard quick-release levers to attach, which makes it easy to break it down to go in the trunk of a car. This trailer also has a fair amount of storage space behind the seat, which we put to good use more than once on some longer trips.

The trailer after being folded for transport or storage.

The trailer hitch that goes on the bike looks like this (picture borrowed from Amazon without permission):

We bought an extra one so both parents' bikes so the trailer could be switched between us easily. The small hole in the hitch attaches to the rear axle of the bike. It adds probably 2-3 mm of additional stuff that have to fit inside the nut or quick release skewer. One of our bikes required a longer quick release skewer in order to make it fit, but I happened to have an old one. The other bike (a Giant OCR3 from about 2005 or so) has a rear dropout that looks like this:


It might be hard to see in this picture, but the recessed area around the end of the quick release skewer is nearly 1/2 inch deep, and not wide enough for the top of the trailer hitch to fit. As I see it, there are basically two possible solutions to this. The first is to get a really long skewer and some kind of spacer to get the trailer hitch outside of the recessed area. I did some research on skewer lengths, and it appears that there might be some out there designed for tandems that might work, but they are hard to find and expensive. The second option is to find a way to attach the hitch to the frame, which is what I opted for. I don't have a picture of it, because it's been disassembled now that we're not actively using the trailer any more, but basically I used electrical conduit clamps to bolt a plastic plate to the rear triangle of the frame, and bolted the hitch to the plate. It was ugly, but it did the job.

I don't have experience pulling other trailers, so it's hard to say how pulling this trailer compares to anything else. The one thing that took some getting used to was that it really forces you to pedal smoothly. There's enough flex in the hitch mechanism and the long bar that attaches to the bike from the side of the trailer that any hard acceleration feels like pulling on a bungee cord and wastes energy. This is probably the case for most trailers that mount on one side (as opposed to some cargo trailers which attach to both sides of the rear axle of the bike).

I never required my children to wear helmets in this trailer, in part because we just hadn't bought them yet at the time. I can say from experience that these trailers are extremely stable, and would be difficult to knock over (I have crashed once while pulling this trailer and it remained upright). This is a fairly roomy trailer, and it worked well for our kids up to the age of about 4. By the time our oldest was 5, it was getting clear that she just didn't fit, so we took the next step and bought a trailer bike, which will be my next blog entry.

Saturday, August 11, 2012

Vintage Raleigh project

This description of my Raleigh project is a bit long, but some of the details are things I wish I could have found on the web when I was figuring some of this out by trial and error.

The idea for this project started two years ago when I acquired a "Family Tandem" made by Oregon-based Bike Friday (see my subsequent post about this). The model I bought had a SRAM Dual Drive shifting system. It simplifies the setup of a tandem a bit by combining a typical rear derailleur system with an internally geared 3-speed hub instead of a front derailleur. I enjoyed the fact that the 3 speed shifter could shift while stopped, and that there was no chain rub on the front derailleur when the rear derailleur was in the highest and lowest gears, something that frequently annoys me on my regular road bike. Some research into alternative shifting systems led me to the Shimano Alfine system. Originally intended for commuter-style bikes, it is a component group based on an 8-speed internally geared hub, and a shifter designed for flat handlebars. Last year, Shimano also introduced a 11-speed version of the hub, but it's quite a bit more expensive than the 8-speed hub. With this many gears, it becomes possible to duplicate the gearing range of many double chainring bikes without any of the redundant gear ratios.

The idea of a bike with a completely internal shifting system is very appealing to me, but I tend to prefer drop handlebars to flat handlebars, and Shimano doesn't sell a shifter compatible with drop handlebars for its Alfine hubs. Fortunately, an obscure Taiwanese company makes one of their own: the Versa road shifter. It turns out I'm not the first one to think of putting an internally geared hub on a road bike, as there are some companies out there who are already selling road bikes based on the Alfine/Versa combination, most notably the Civia Bryant. The Civia Bryant adds disc brakes and belt drive to the setup, both of which I find particularly intriguing on a road bike, but its MSRP of $1850 is a bit pricey for me. Another option is the Dynamic Synergy, which has a more typical road bike setup, but still retails for $1000. So, I wanted to see if I could build a similar bike for less money using an old road bike.

The bike

The bike I used for this is a 1986 Raleigh Olympian, which I found on Craigslist last year, shown in its original form after I bought it. It's a pretty standard 1980s lugged steel frame, sturdy and reliable, probably a bit heavier than the high end frames of the time, but totally functional for how I plan to use it. The second reason for my interest in this particular bike is nostalgia: I bought one of these brand new as a teenager, and it was the bike that really got me into cycling. Unfortunately, I didn't have it very long because it was stolen, but I always liked the look of the bike, which was a very classic traditional look even at the time. It was amazing to find a bike exactly like the one I once had, nearly pristine, probably having sat in a garage for the last 25 years without more than 100 miles of riding.


New components for the drivetrain upgrade

I acquired all of the parts for converting the bike to internal gearing over the last several months. These are the parts I needed:
  • Versa Shift/Brake levers. These are frequently sold for over $200 by online retailers, but I bought a used pair on eBay for under $100. Note that it is designed to look very similar to recent Shimano shifters, but that unlike the Shimano shifters, the brake lever itself does not rotate to the side to actuate a shift, but instead there are two shift levers behind the brake lever.
  • A rear wheel based on the Alfine rear hub, made with the Velocity Dyad rim, which is about 25 mm wide. This wheel is made by Handspun, and is sold as the "Pavement Series 2" by a variety of retailers. I've had pretty good luck buying this and a number of other fairly obscure bike parts from Niagara Cycle Works on Amazon, though they tend to take a few days to ship things sometimes (they don't advertise any shipping time they can't meet, though).


  • Shimano Alfine/Nexus 16 tooth cog. The original bike came with 52 and 42 tooth chainrings on the front. After reading the documentation on the hub and creating a spreadsheet with gear ratios, I concluded that I could duplicate the original gear range using the 42 with a 16, or the 52 with a 20, and I chose the 16. From what I've been able to find online, it appears these cogs are available in sizes of 16, 18, 19, 20, and 22 teeth.
  • The Shimano Nexus/Alfine "small parts kit". This is Shimano part number SG-S501. It contains the nuts that go on the ends of the axle, a lock ring that holds the cog in place, and some other small parts needed for the rear shifting system to work. This is generally sold separately from the hub, or at least it was for most of the rear wheels I saw for sale.
  • Shift cable fixing bolt unit. This is a small bolt and nut that go on the end of the cable to attach it to the hub. For some reason, it is not included in the small parts kit, and a lot of the online retailers charge an extra $5 for it. That seems like too much for what it is, but I'm more annoyed at Shimano for not including it in the small parts kit.
  • Shifter cable
  • Shimano shift boss flat barrel stops. These are adapters for retrofitting older frames set up for downtube shifters to work with handlebar-mounted shifters.
  • New tires (necessary due to the change in wheel size). I went with 35 mm Michelin City tires, which are about 3 mm wider than the 1 1/4 inch tires originally on the bike.

Optional Components

There were a few other items that I also bought as part of the project that were not strictly necessary for the switch to internal shifting.
  • A new front wheel. I could have kept the front wheel that came with it, but the original bike came with 27" wheels, which are not particularly common any more, and I wanted to switch to 700C wheels front and back, so I could put slightly wider tires on. (27" rims have a diameter of 630mm, 700C wheels are 622mm.) In this case, Handspun offers a front wheel with the same Velocity Dyad rim on a Deore XT hub with disc mounts. It's probably a little nicer hub than I really needed for this bike, in particular because I'm not aware of a way to retrofit a frame and fork like this for disc brakes. However, since the Alfine rear hub is already disc compatible, I like the idea of having a matching front and rear wheel that are disc compatible so they could be used on another frame with disc brakes in the future.
  • A few miscellaneous items: luggage rack, toe clips that were not on the original bike, and white saddle and handlebar tape.

By the time I was finished, I had several old parts that I no longer needed (front and rear wheels, front and rear derailleur, shifters, brake levers). I was able to recoup about $100 of the money I sunk into the project by selling off all the old parts on eBay.

Installation notes

There are a few challenges I ran into for the installation. Getting the cog onto the hub requires snapping on a steel lock ring, which turned out to be really hard if you don't know the proper technique, and not too bad if you do. I found a YouTube video that helped quite a lot with that. I'd post a link, but I can't find it at the moment. There following are some other challenges and their solutions.

Non-turn washers and the angle of the axle

The shifting mechanism in the hub shifts when a ring on the outside of the chain cog rotates relative to the fixed part of the axle. This mechanism is spring loaded so that the cable can pull on it to shift it. This requires that the fixed part of the axle not rotate, so the Alfine small parts kit comes with 2 sets of "non-turn washers" that go on the outside of the dropouts before the outer nuts are threaded on (it's the white washer in the picture below). The small parts kit comes with two different sets of these washers, which are meant for different dropout angles, and there are a couple of other ones for different angles that can be bought separately. The Shimano instructions want you to pick the one that allows the cable to come in parallel to the chain stay. Note that if that were the case in the picture below, there would be very little room for cable housing between the housing guide on the chain stay and the arm that comes out of the hub to receive the cable housing. Looking at pictures of bikes built around this hub, like the Civia Bryant, it's obvious that the cable housing guide is much further forward on the chain stay, leaving room for about 4 inches of cable that run parallel to the stay. Since I didn't have that kind of room, I just chose lock washers that would send the cable out the back, and routed the cable much the way you would with a normal rear derailleur. It's less aesthetically appealing than the way Shimano tells you to do it, but it works fine.


Fitting the axle in the frame

The Alfine hub is designed for a rear dropout spacing of 135 mm. As far as I could tell, my frame had a spacing of 125 mm, which was the standard spacing during the 6 and 7 speed era (mine had a 6 speed freewheel), so it needed to be 1 cm wider to fit the Alfine hub. Sheldon Brown's invaluable web site has a page about permanently spreading the stays of an older steel frame to fit a new drivetrain (I am not a materials scientist, but I believe doing this to an aluminum frame is not advisable). For spreading the stays, I came up with an alternative (and I believe simpler) process to what Sheldon Brown described. Basically, I used a car jack between the dropouts with cardboard on either side to protect the frame from scratching. Steel will spring back certain amount, so it was an iterative process of cranking the jack open a few millimeters at a time and backing it off to see how far I had spread the dropouts, until I had the exact spacing I wanted without going too far.

Finding fourth gear

The installation instructions tell you to put the shifter in fourth gear, and adjust the cable tension so that two yellow lines on the hub line up. The flat bar shifter has numbers to tell you which is fourth gear, but the Versa levers don't. I figured it should be easy enough go to first gear and go up three clicks, except first gear wasn't the one I thought it was (due to cable pull doing the opposite of what it does for a rear derailleur). To get to first gear, pull on the end of the shift cable while pressing the smaller shift lever until it doesn't come out any further, and then three clicks of the bigger lever gets you to fourth gear. At this point, getting the alignment correct takes a little trial and error moving the cable fixing bolt on the cable so that when in place, the marks line up, or close enough that they can be lined up using a barrel adjuster. This bike has a barrel adjuster on the shift boss cable stop, but they can be inserted elsewhere, and based on my experience, it's highly recommended.

The finished bike

Here's the finished project. I think it looks great, and it's a lot of fun to ride, although so far I've mostly just taken it on short rides around the neighborhood. One thing I like about the wider tires is that I can run them down as low as 25-30 PSI before I need to put more air in them (the max on these is about 80 PSI).


In its current form, the bike weighs about 30 pounds, probably heavier than it was originally, but not significantly. I had hoped to do this for less than $500, but in writing this I now realize that I didn't quite succeed in that. Most of the cost is in the shifters and new rear wheel. Both items do show up on eBay periodically, so costs can be kept down for someone willing to buy used and wait for a good deal.

Here are a few other observations:
  • For riders familiar with modern road bikes and integrated brake/shift levers, the operation of the Versa shift lever will be slightly counterintuitive. The larger lever, which pulls on the cable, shifts to a higher gear, and the smaller lever, which releases the cable, shifts to a lower gear, which is opposite of a typical road shifter for a rear derailleur. It's not really the fault of the shift lever, as this is more a function of the design of the Alfine hub.
  • Shifting works great once you get used to which lever to use. On some 3-speed hubs, it's possible to shift to any gear at a complete stop and start in the new gear. The Alfine hub behaves a bit more like a rear derailleur system in that it takes a little forward motion to engage the new gear, but as far as I can tell, it shifts under load pretty well.
  • Some have observed that the jumps between gears in the Alfine 8 hub are fairly large. Compared to a modern drive train with lots of single tooth jumps between gears, that's true, but it's all relative. The original freewheel on this bike was a 14-16-18-21-24-30, and the maximum jump between gears with that drive train was actually the same as the Alfine hub. With the gear ratios I've chosen, I've essentially replaced two overlapping 6-speed gear ranges with a single 8-speed gear range that has about the same step sizes and same total range.
  • Braking performance is quite poor in the bike's current state. It wasn't great even with the old rims, so I had already replaced the brake shoes with Shimano 105 shoes even before switching the wheels out. I'm still using the original 1986 brake cables, which predate the Teflon coated housings that are common today, so my next step is to install a modern set of brake cables and housings and see if that helps. If that's not enough, the next step will be aftermarket brake pads, and maybe eventually new calipers. One additional contributing factor could be that the rims do not have a machined braking surface. They are available with machined sides, but these models didn't have them because they are on disc brake hubs. I don't know how much a difference that makes: lots of rims used to not have machined sidewalls and many of them worked fine, so I'm hoping the right brake pads and cables will help here.
  • Finally, a note about the brake hoods on the Versa levers. The brake levers look very similar in shape to Shimano 6600 and similar models. To go with the white seat and handlebars, I thought it would be nice to add white brake hoods, like those made by Hudz. I wasn't sure whether they would fit, so rather than risking the full price, I bought a used pair on eBay. They don't fit. Actually, they fit perfectly on the base of the lever, but the Shimano 6600 hoods are about a full centimeter longer at the top, reaching way past the tops of the Versa levers. I was able to re-sell the Hudz on eBay for about what I paid for them, so no harm done, but the take away from this is that despite their similar appearances, Shimano-compatible brake hoods won't work on Versa levers.