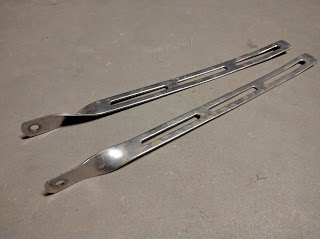
These rails are designed to be bent to fit the particular frame on which they are mounted, and can fit nearly any frame, provided there is a set of mount points to attach to. In the case of both the Raleigh and X-Peria tandem, there are no upper eyelets, so in both cases I made my own mounts to attach to other available mount points.
In the case of the Raleigh frame, I used the rear brake mount. The custom mount was made from 1/8" (3.175 mm) aluminum sheet. Because I intended for the mount to be specific to this bike and therefore not adjustable, I cut out the shape I had in mind in paper first to ensure that all of the holes were in the right place. I cut the aluminum to the shape I wanted with a circular saw (a fairly crude tool for this sort of job, but it's what I had available and it cuts the aluminum of that thickness relatively easily). I drilled the holes, and used a sander to smooth all of the edges. Bending the aluminum sheet to the desired shape takes a lot of leverage, so I used the holes to attach the ends of the cut out piece to some long pieces of scrap wood. I was eventually able to get the mount into the shape I wanted, but the aluminum got pretty scratched up in the process, so I did some more sanding on the finished product to remove all of the scratches, leaving it with a brushed look.
Here's the whole rack, held perfectly level by the custom mount.
The X-Peria tandem does not have dedicated upper rack mounts, nor does it have a caliper brake mount in the rear, since it is a disc brake frame. As I noted in my original blog about the tandem, there is a seatstay bridge where one would expect a caliper brake mount, which has a threaded hole underneath, possibly for mounting a fender. I used the same method and gauge of sheet aluminum to create the fender mount for the X-Peria. Since I happened to have some white paint close to the color of the bike, I painted this one.
The threaded hole on the frame is for an M4 screw (similar to what is used on water bottle mounts), but there is not a lot of clearance, so instead of a standard water bottle bolt (below left), I used an angle head screw (right).
Combined with a hole to match the shape, the screw protrudes only a minimal amount, leaving more tire clearance.
This is what the finished product looks like, installed.


No comments:
Post a Comment