Wednesday, September 21, 2016

3D printed cable guide for X-Peria tandem fork

In my original entry about the X-Peria tandem, I noted that the fork did not have an obvious method for routing the cable to the disc brake, but that there was a screw hole on the inside of the left fork blade. My solution was a 3D-printed bracket designed to attach to the screw hole and reach around behind the fork blade where the cable would pass through it.

I used OpenSCAD, a free CAD software to create the design. This is an OpenSCAD rendering:


Note that the hole for the screw mount has a flared shape to accommodate an angle-head screw, so as to minimize the amount the screw protrudes into the space inside the fork. The OpenSCAD source code for this design is below:

guidelength = 20;
width = 15;
cablesize = 5;
thickness = 1.5;
screwhole = 5;
len1 = 5;
len2 = 5;
th2 = 2.5;
angle = 70;
bendradius = 10;

$fs=0.01;
$fa=3;

r2 = screwhole/2+4;
cr = cablesize/2;
ofs = width/2-r2;
d = (guidelength-width)/2;

rotate(angle) {
difference () {
    union () {
        // cable guide outer
        translate([0, 0, -d]) cylinder(guidelength, r=cr+thickness);

        // connector section 1
        translate([0, -th2/2, 0]) cube([len1, th2, width]);

        // connector bend
        translate([len1, -th2/2-bendradius, 0]) rotate([0, 0, 90])
        rotate_extrude(angle=-angle) {
            translate([bendradius, 0, 0]) square([th2, width]);
        }
    }

    // cable guide hole
    translate([0, 0, -d-0.01]) cylinder(guidelength+0.02, r=cr);
}


// connector section 2
translate([len1, -bendradius-th2/2, 0]) rotate([0, 0, -angle])
translate([len2, bendradius+th2/2, width/2]) rotate([90, 0, 0])
translate([0, 0, -th2/2])
    difference() {
        hull() {
            cylinder(th2, r=r2);
            translate([-len2/2, -ofs, 0]) cylinder(th2, r=r2);
            translate([-len2/2, ofs, 0]) cylinder(th2, r=r2);
            translate([-len2-1, -width/2, 0]) cube([1, width, th2]);
        }
        translate([-len2-r2, -width/2-0.05, -0.05]) cube([r2, width+0.1, th2+0.1]);

        // Screw hole
        translate([0, 0, -0.05]) cylinder(th2+0.1, r=screwhole/2);

        // flared hold for angle head screw
        translate([0, 0, -1]) cylinder(screwhole/2, screwhole, screwhole/2);
    }
} 

The part was printed in white ABS plastic by Shapeways. I have produced other parts using Shapeways before and have found the results to be very high quality. A couple of weeks after placing my order, the cable guide arrived.


The hole for the cable was actually just a little too tight for the cable to fit, so I widened it slightly with a drill. This is actually the second version of the design, the result of some changes I made to my first design after I had a chance to test it on the bike. Here is the final product, installed on the bike.


Monday, September 19, 2016

Custom mounts for Topeak Explorer rack

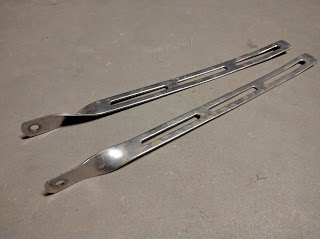
I have the Topeak Explorer rack on two of my bikes, the Raleigh Olympian and the X-Peria tandem. This rack comes with adjustable steel rails that attach to the upper part of the rack.


These rails are designed to be bent to fit the particular frame on which they are mounted, and can fit nearly any frame, provided there is a set of mount points to attach to. In the case of both the Raleigh and X-Peria tandem, there are no upper eyelets, so in both cases I made my own mounts to attach to other available mount points.

In the case of the Raleigh frame, I used the rear brake mount. The custom mount was made from 1/8" (3.175 mm) aluminum sheet. Because I intended for the mount to be specific to this bike and therefore not adjustable, I cut out the shape I had in mind in paper first to ensure that all of the holes were in the right place. I cut the aluminum to the shape I wanted with a circular saw (a fairly crude tool for this sort of job, but it's what I had available and it cuts the aluminum of that thickness relatively easily). I drilled the holes, and used a sander to smooth all of the edges. Bending the aluminum sheet to the desired shape takes a lot of leverage, so I used the holes to attach the ends of the cut out piece to some long pieces of scrap wood. I was eventually able to get the mount into the shape I wanted, but the aluminum got pretty scratched up in the process, so I did some more sanding on the finished product to remove all of the scratches, leaving it with a brushed look.


Here's the whole rack, held perfectly level by the custom mount.


The X-Peria tandem does not have dedicated upper rack mounts, nor does it have a caliper brake mount in the rear, since it is a disc brake frame. As I noted in my original blog about the tandem, there is a seatstay bridge where one would expect a caliper brake mount, which has a threaded hole underneath, possibly for mounting a fender. I used the same method and gauge of sheet aluminum to create the fender mount for the X-Peria. Since I happened to have some white paint close to the color of the bike, I painted this one.


The threaded hole on the frame is for an M4 screw (similar to what is used on water bottle mounts), but there is not a lot of clearance, so instead of a standard water bottle bolt (below left), I used an angle head screw (right).


Combined with a hole to match the shape, the screw protrudes only a minimal amount, leaving more tire clearance.


This is what the finished product looks like, installed.


Wednesday, August 24, 2016

MC286 with SRAM 1x

SRAM has been pushing their 1x groups for road use lately, and has taken it a step further with the recent release of the SRAM Apex 1x group. One important aspect of the new group for anyone trying to build a cyclocross bike on a budget was the release of a new version of the PG-1130 cassette: a 11-42 cassette that is compatible with the 10-speed freehub standard that is found on older road wheels and is still in use on MTB wheels.

At the time I was buying the frames and parts for these bikes, I noted in my post about components that my choice to buy Mavic's budget-oriented Crossride MTB wheels forced me to use only 10 of the 11 cogs in the Shimano 105 cassette because MTB wheels are still using the 10-speed freehub standard. Building a cyclocross bike with the Crossride wheels and SRAM 1x at the time would have required using an XD cassette and buying the XD driver that is available for this particular Mavic hub (which retails for $100). The ability to use a wide range cassette that is compatible with the built-in freehub on stock MTB wheels reduces the cost of a SRAM 1x build significantly.

Since Heather likes the SRAM shifters on her road bike better than Shimano, this summer I decided to convert her cyclocross bike to SRAM 1x so I could use the Shimano 105 group on another bike. For the conversion, I used SRAM Rival brake levers and right shifter, Rival crankset with 42t chainring, Apex derailleur, and the aforementioned PG-1130 cassette.

The original setup consisted of a 50-34 crankset and 11-32 cassette. The new setup results in a lowest gear (42/42 for a 1:1 gear ratio) that is slightly lower than the original 34/32. The highest gear, a 42/11, is approximately equivalent to a 50/13, meaning that the new setup replicates the original setup minus the highest gear of 50/12 (since the 11 tooth cog was never installed). Having ridden my cyclocross bike for over a year, I don't believe I've ever used the 50/12, so I don't believe this is particularly important for the type of riding we do (or most riders do) on this kind of bike.


Gearing range is clearly not a problem, but the other possible caveat to a 1x conversion is gear spacing. I did some spreadsheet analysis of the gear ratios on the original 2x10 setup compared to the 1x11 setup and found that the difference is not that large. The 12-32 cassette has a maximum jump in gear ratios of nearly 16%, between the 19 and 22 tooth cogs. The 11-42 has a maximum jump of 18%, between the 13 and 15 tooth cogs. Perhaps more importantly, that larger jump is closer to the edge of the range in less used gears, where the largest jump was previously in the middle. The difference should not be particularly noticeable to most riders.

Based on our experience so far, I think the SRAM 1x groups are an excellent choice for cyclocross and gravel bikes. It's not surprising to see so many bikes coming out with this setup from the bike bike brands.